Google Ads
Create a new conversion in Google Ads
How to set up a purchase conversion in Google Ads
Skip this step, if you've already created a purchase conversion in Google Ads
We highly recommend setting up the native Google Ads conversion action instead of importing GA4 conversions. Here's why: Use Google Ads conversion tracking instead of importing GA4 events
- Open Conversions in Google Ads

- Initiate a new conversion creation
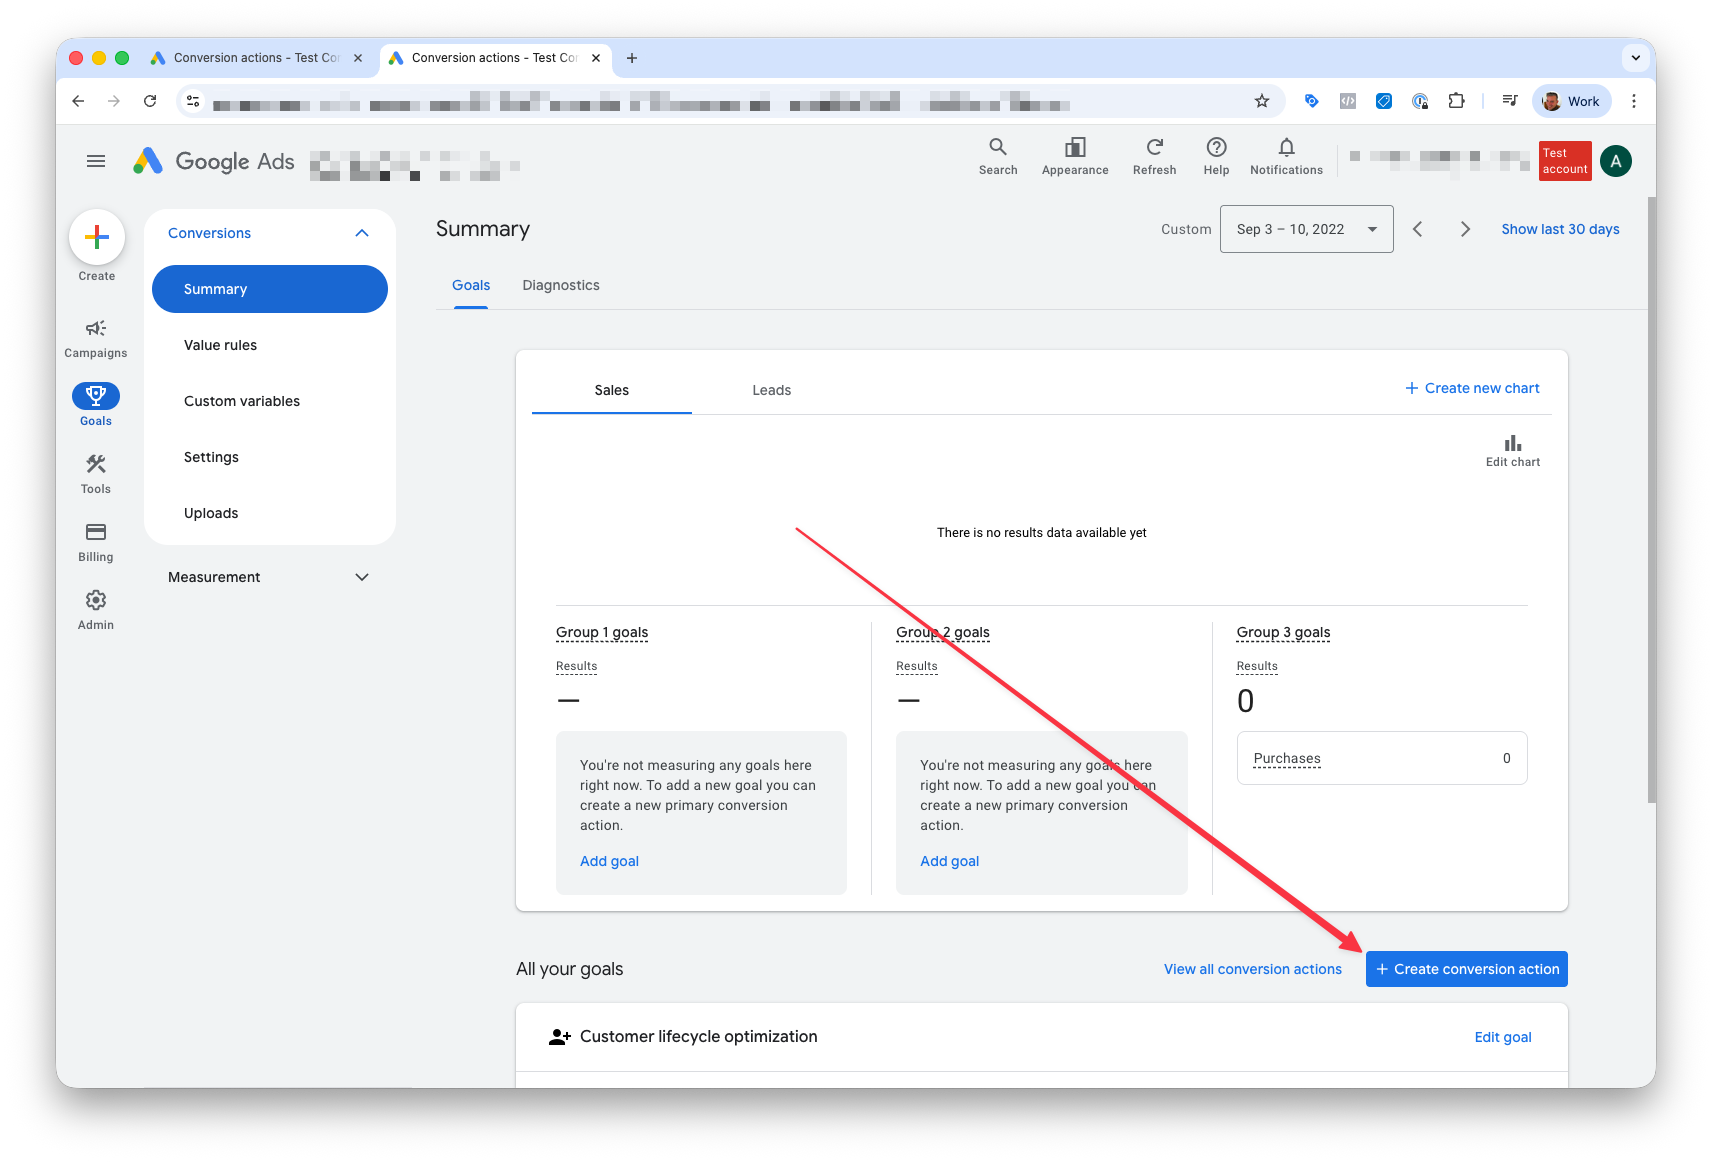
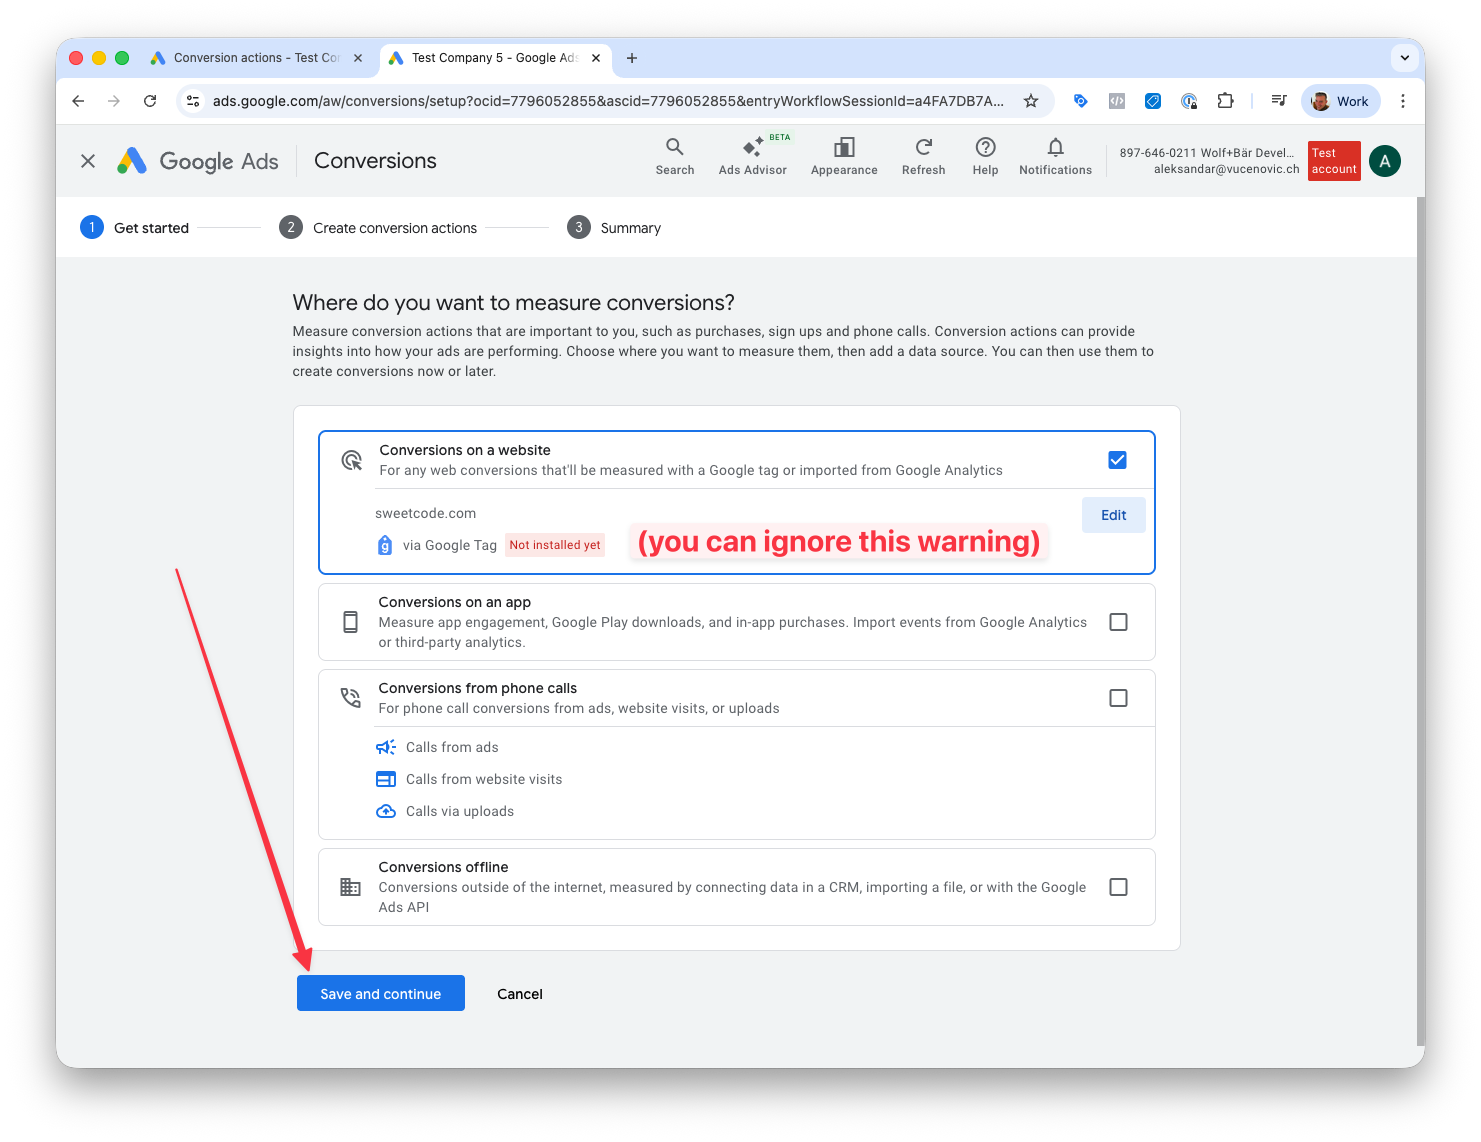
- Choose conversion type
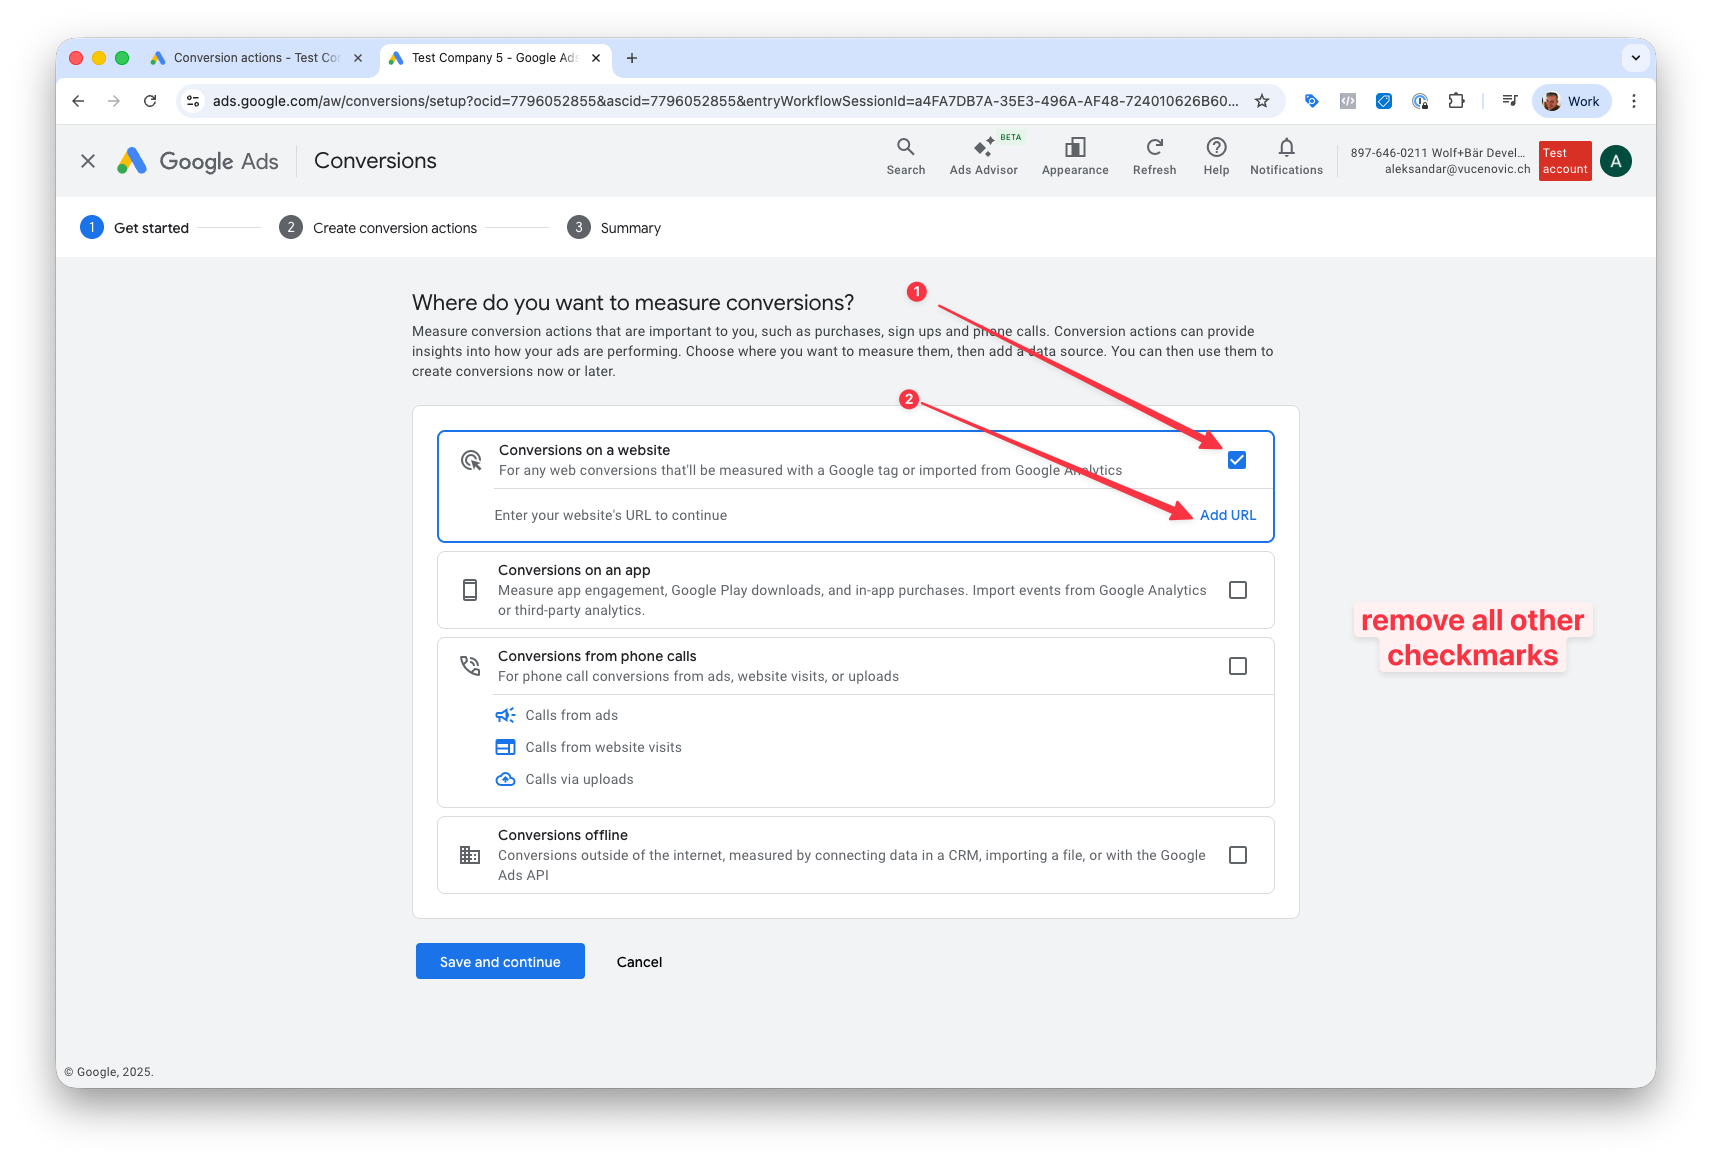
Conversion on a website.
Add the URL of your website.
(Remove all other checkboxes)
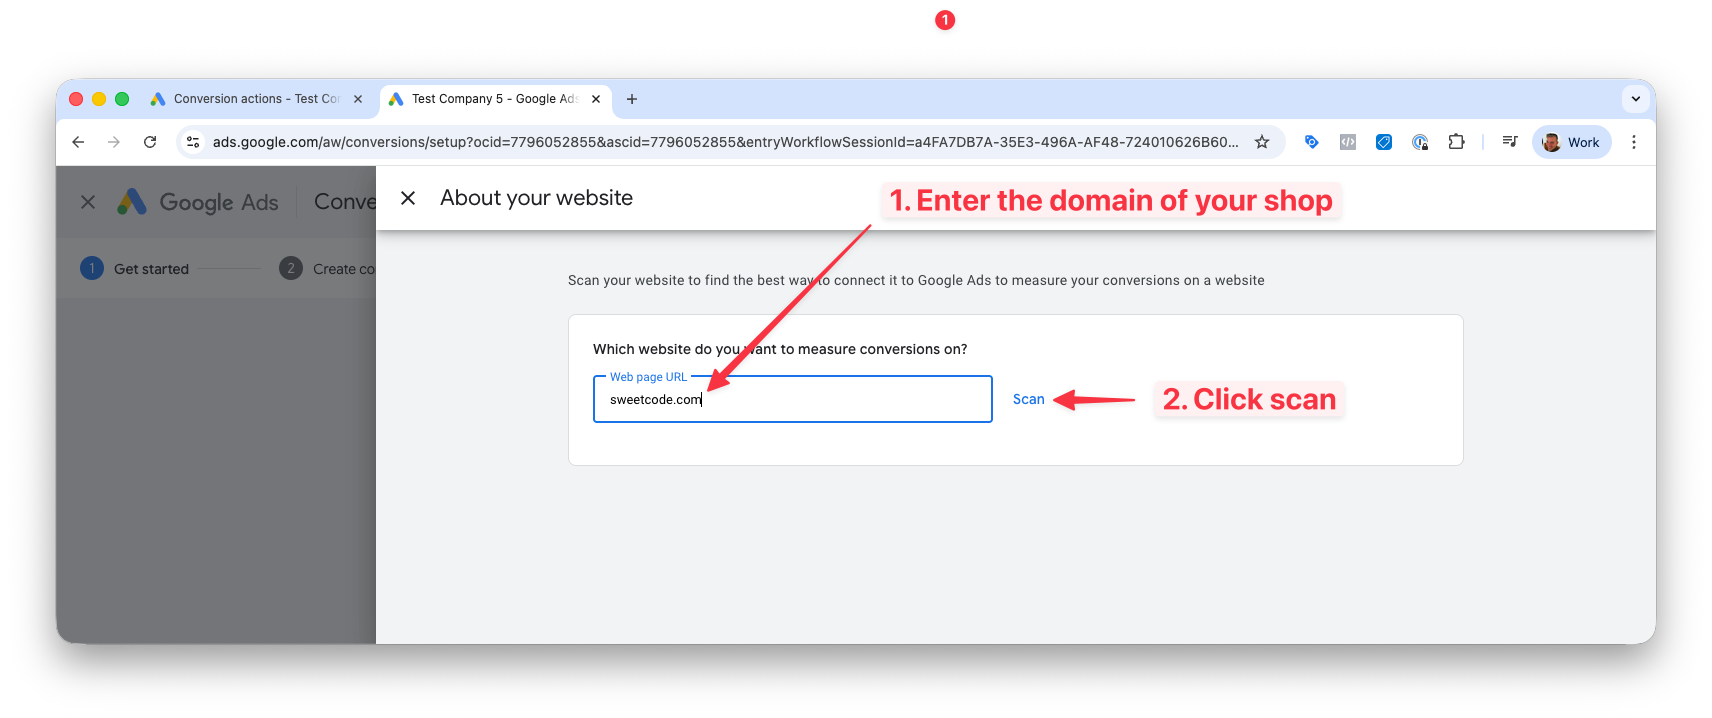
- Scan your domain
- Choose the
Google tagonly
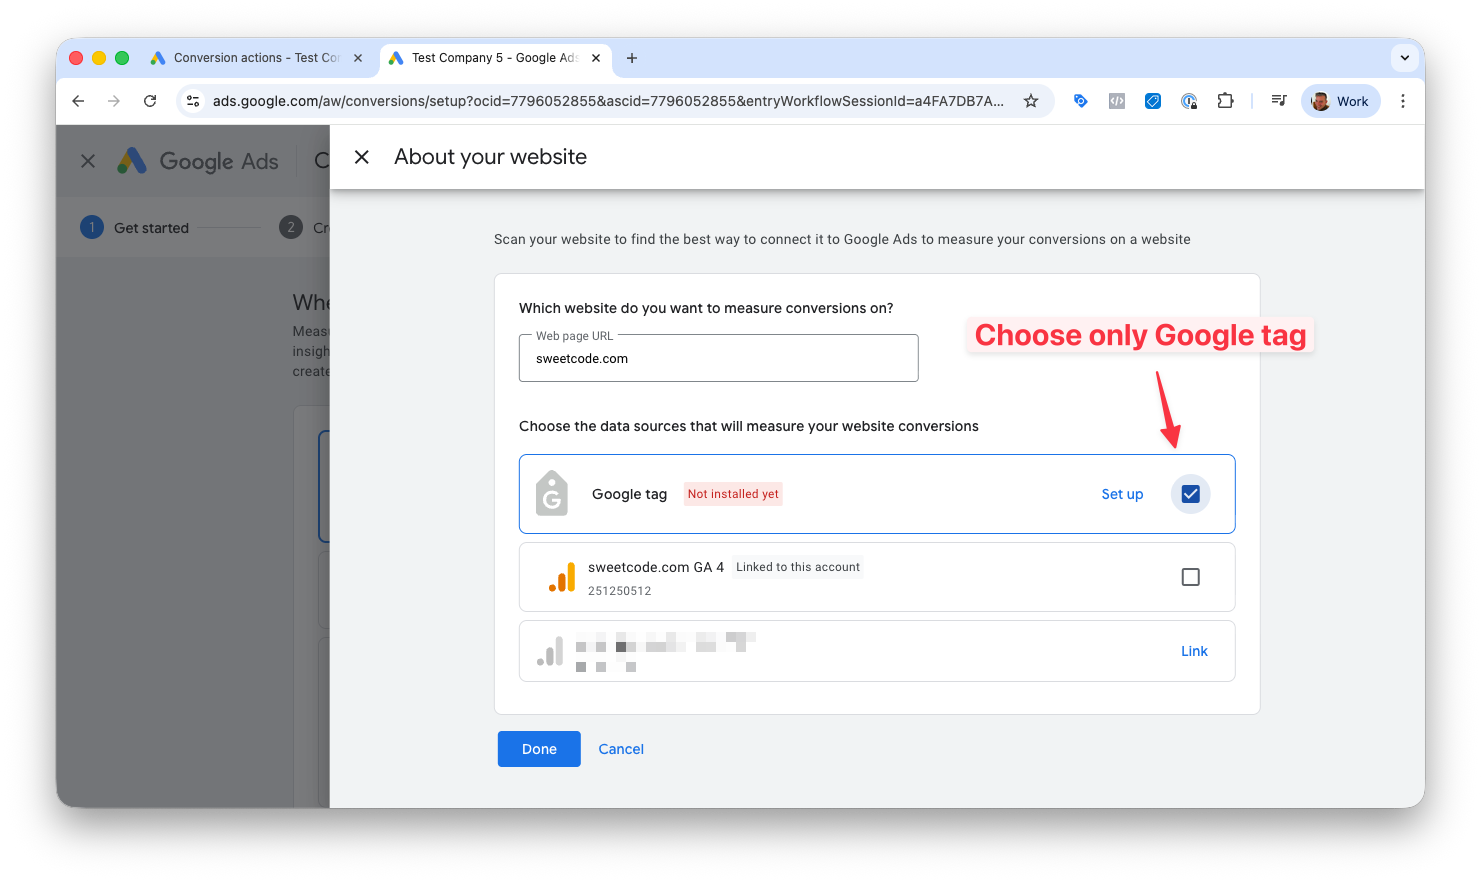
- Save and continue
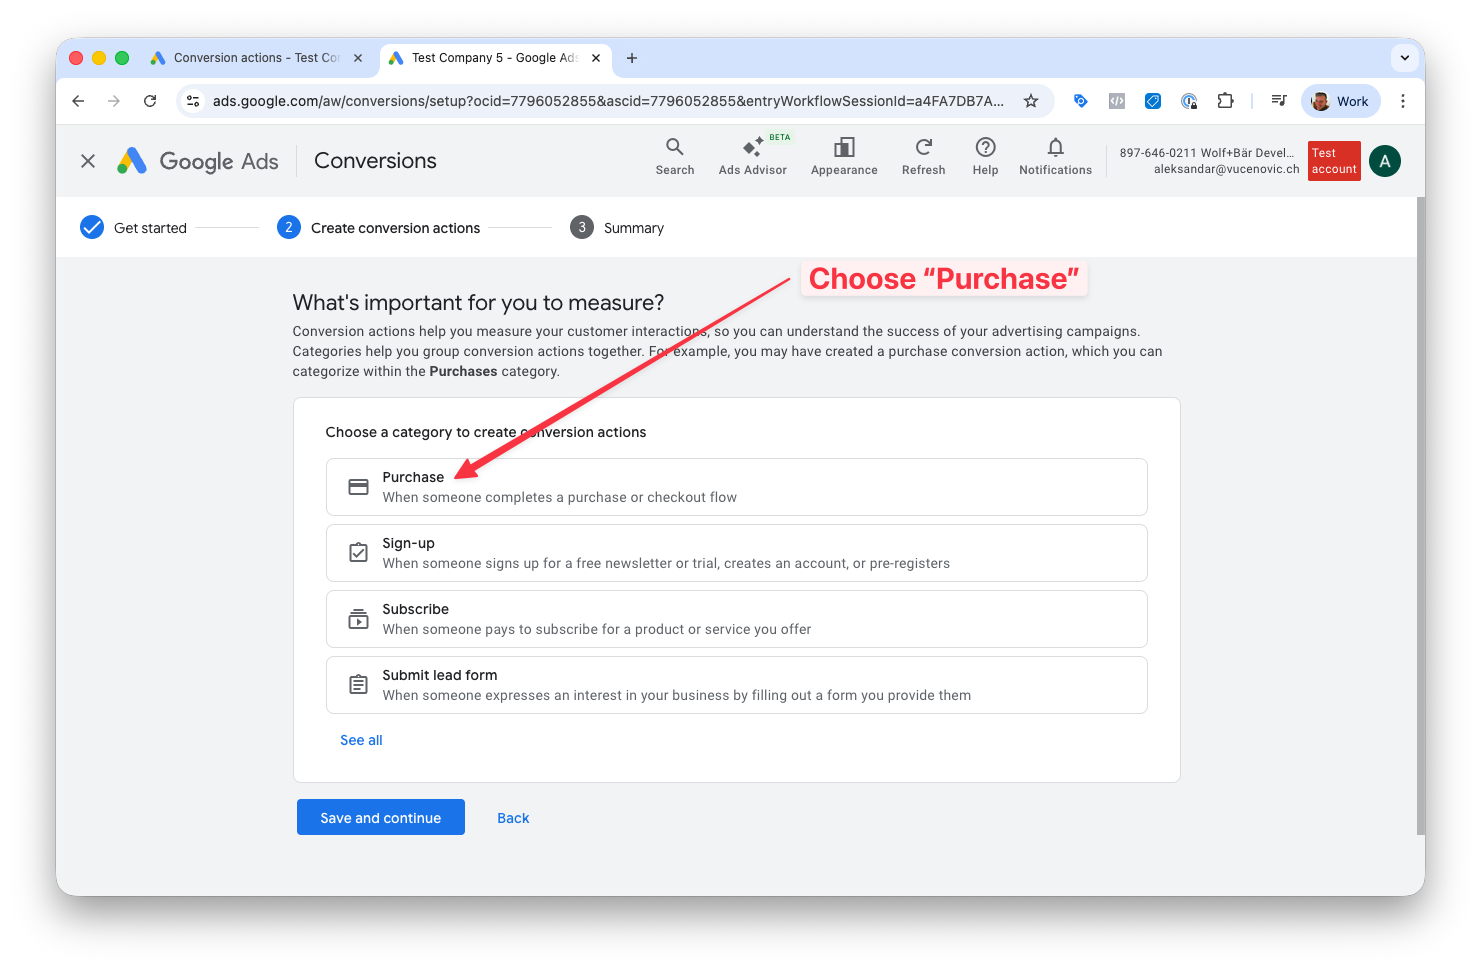
- Choose
Purchaseas the conversion category
-
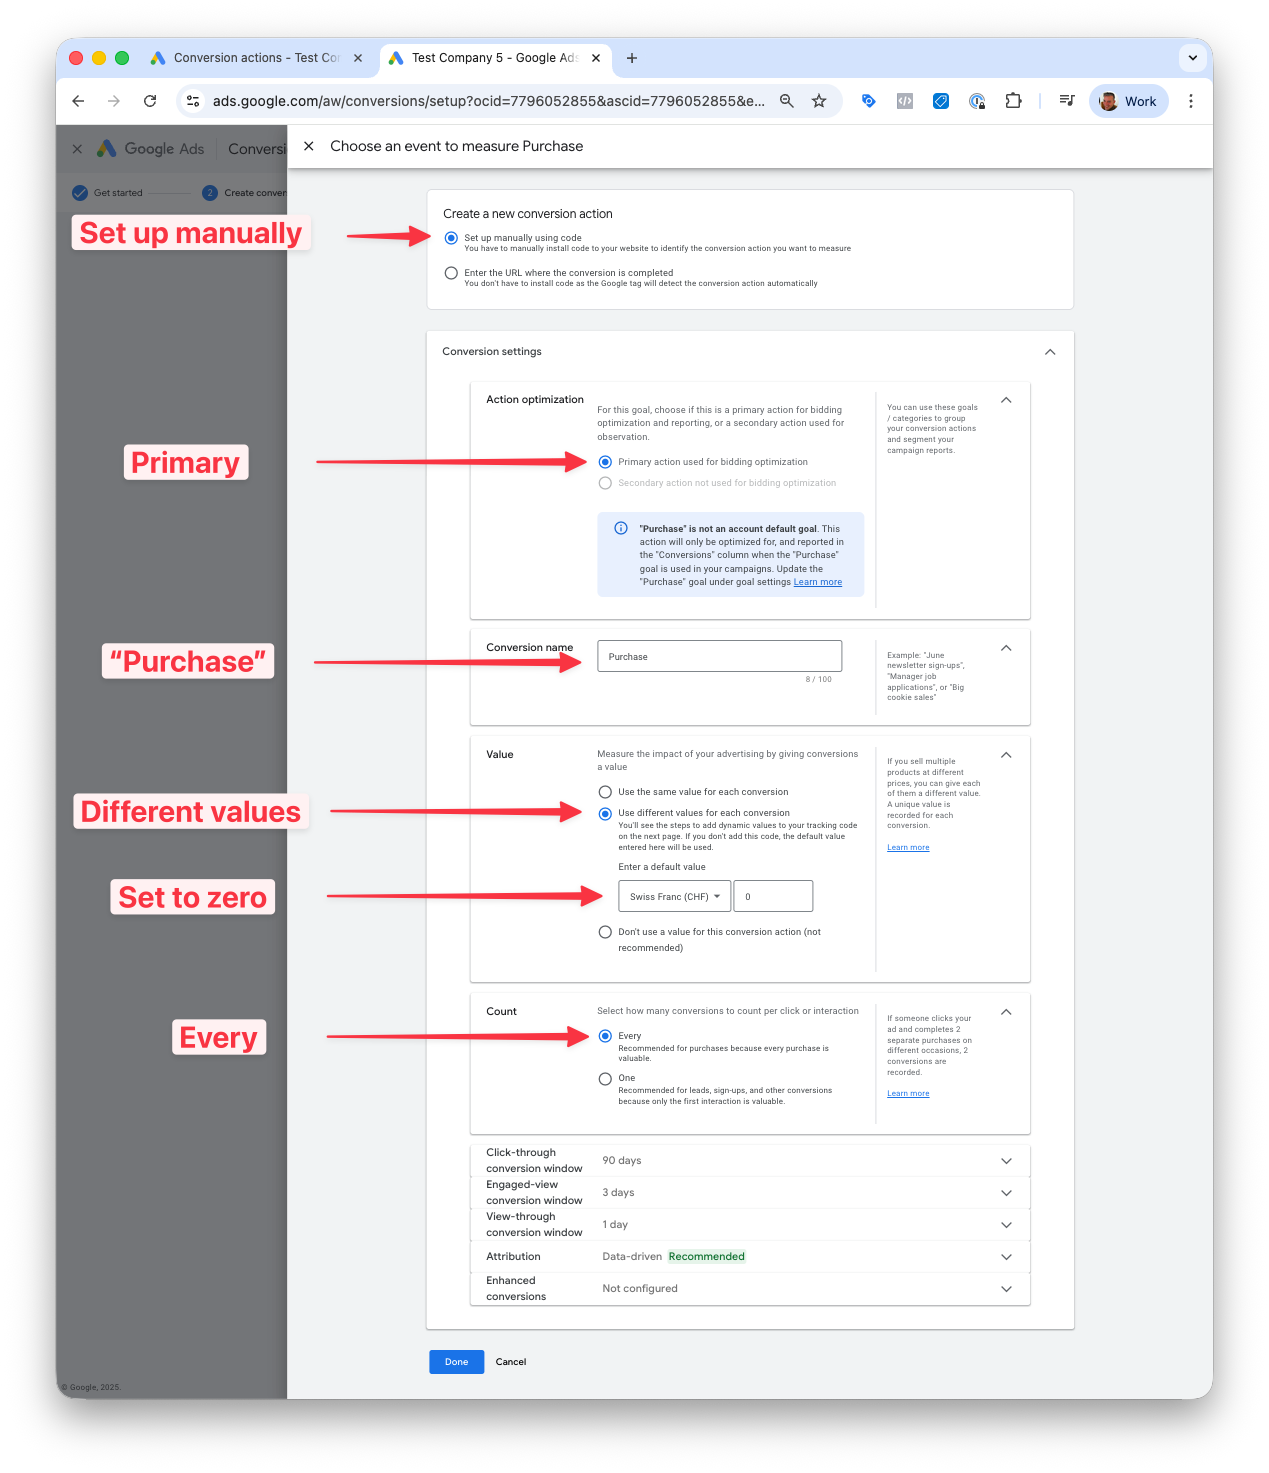
Configure the Google Ads conversion settings
Use the following default settings. Only change if you know what you're doing.
- Create new conversion action: Set up manually using code
- Action optimization: Primary action used for bidding optimization
- Conversion name: Purchase
- Value: Use different values for each conversion
- Set up using: Event snippet (not Google tag)
- Default value: zero
- Count: Every
Configure the plugin
How to find and set the conversion ID and conversion label
-
Get the conversion ID and conversion label
Open the purchase conversion in Google Ads.

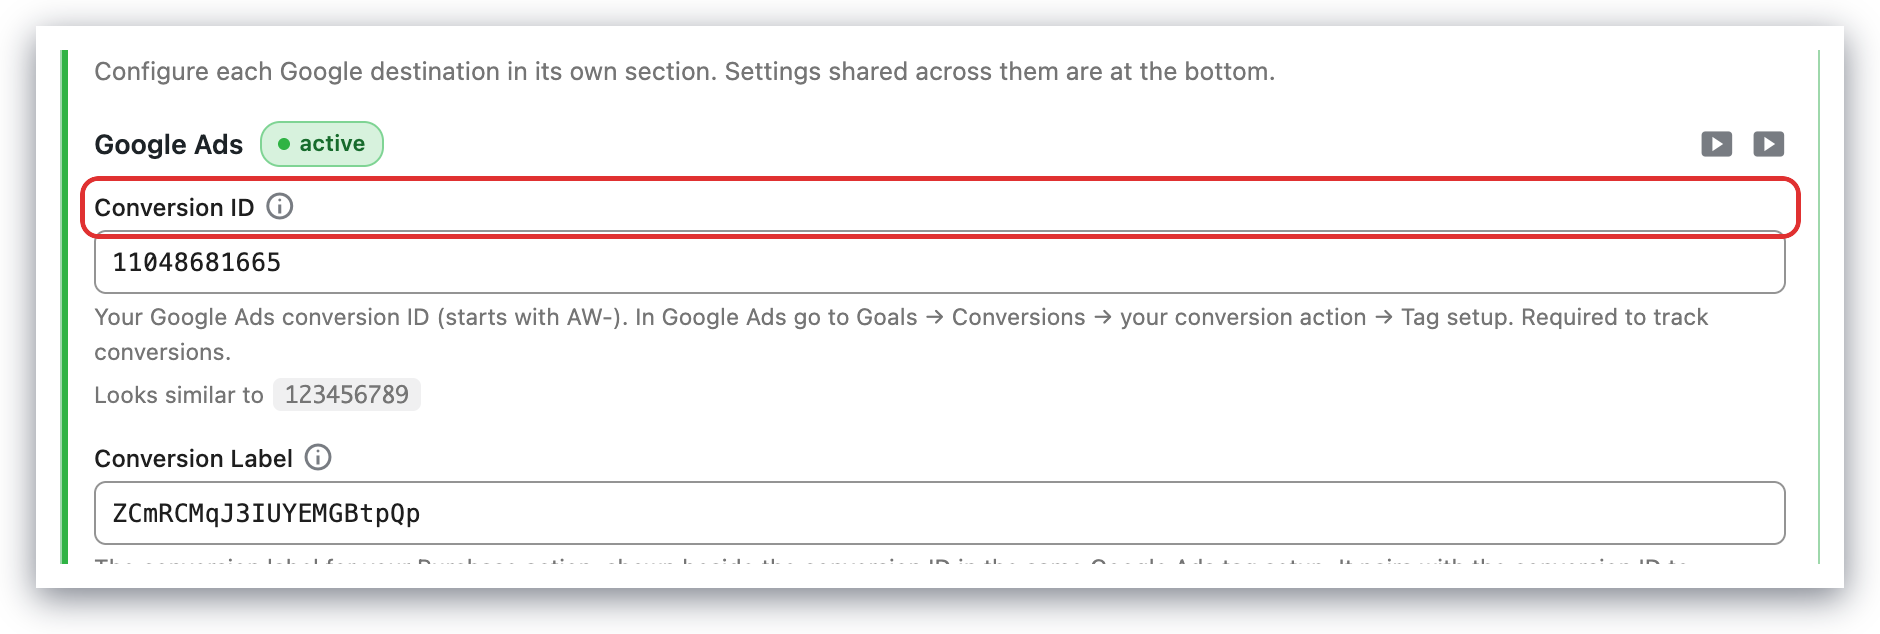
Copy the purchase conversion ID and label from the Google Tag Manager tab.

-
Set the conversion ID and label in the plugin
Using the Google for WooCommerce plugin at the same time
The Pixel Manager works together with the Google for WooCommerce plugin (formerly named Google Listings & Ads). As soon as Google Ads tracking is active in the Pixel Manager, it automatically switches off Google for WooCommerce's own tracking, so no duplicate conversions or remarketing events are sent.
Google for WooCommerce keeps doing everything else: the Merchant Center connection, the product feed sync, and campaign management. This also applies if you connect Google for WooCommerce to Merchant Center only and not to Google Ads.
If Google for WooCommerce generates your product feed, set the product identifier in the Pixel Manager to Post ID with gla_ prefix so the tracked IDs match the feed. See Product identifier and Plugin Compatibility.
Conversion Cart Data
This feature adds another level of detail to the purchase conversion. Along with the conversion value, it sends the individual items that were sold. In return, Google Ads reports revenue, cart size and item level performance for your Shopping campaigns.
Your Google Merchant Center ID is the numeric ID of your Google Merchant Center account. In the Pixel Manager it has exactly one job: saving it under Tracking Pixels → Google (Ads & GA4) → Merchant Center ID switches on Conversion Cart Data for Google Ads. There is no separate on/off toggle, and the feature is available in the free version.
Benefits
- Detailed reporting on items sold
- A clear measure of revenue (and gross profit, if you supply cost of goods sold) generated by Shopping Ads
- Detailed reporting on cart size and average order value
Google support article on conversions with cart data.
What the Google Merchant Center ID is
Google also calls it the Merchant Center account ID. It is the numeric identifier of the Merchant Center account that holds your product feed. It has 6 to 12 digits and looks like 123456789.
Google Ads uses it to work out which product catalog the item IDs in your purchase conversion belong to, so it can match the items you sold against the products in your feed.
It is an account identifier, not a credential. It is not an API key, a token or a secret.
Don't confuse it with the other Google IDs
The Google setup asks you for several identifiers that look interchangeable but are not:
| ID | What it is | Where it goes in the Pixel Manager |
|---|---|---|
Merchant Center ID (123456789) | Your Merchant Center account ID | Google (Ads & GA4) → Merchant Center ID |
Google Ads Conversion ID (AW-123456789) | Identifies your Google Ads account for conversion tracking | Google (Ads & GA4) → Conversion ID |
Conversion Label (AbC-D_efG…) | Identifies one specific conversion action | Google (Ads & GA4) → Conversion Label |
GA4 Measurement ID (G-XXXXXXX) | Identifies a GA4 web data stream | Google (Ads & GA4) → Measurement ID |
GA4 Property ID (123456789) | Identifies a GA4 property for the Data API | Google (Ads & GA4) → Data API Property ID |
Google Ads customer ID (123-456-7890) | Your Google Ads account number | Not used by the Pixel Manager |
The Merchant Center ID and the GA4 Property ID are both plain numbers, so they are the easiest pair to mix up. The Merchant Center ID comes from merchants.google.com, the GA4 Property ID comes from Google Analytics.
Find your Google Merchant Center ID
Sign in to the Google Merchant Center. The account ID is in your browser's address bar, in the a URL parameter, and it is there on every page of the account:
https://merchants.google.com/mc/overview?a=123456789
                                           ^^^^^^^^^
                                           Merchant Center ID

Copy only the digits after a=. Don't copy the whole URL, and don't include the a= itself.
Google reorganizes the Merchant Center interface regularly, and the ID has moved between screens over the years. The a URL parameter has stayed put through every version, so it is the one place we can point you to that keeps working.
The a parameter always shows the account you currently have open. If you work with several accounts, or with sub accounts under an advanced (multi client) account, switch to the account that holds the feed for this shop first, then read the ID from the URL. Entering the ID of a different account means Google Ads cannot match your items and the cart data reports stay empty.
Add the Merchant Center ID in the Pixel Manager
- In WordPress, open the Pixel Manager.
- Go to Tracking Pixels → Google (Ads & GA4).
- Open Show advanced settings in the Google Ads section.
- Paste the number into the Merchant Center ID field.
- Save.
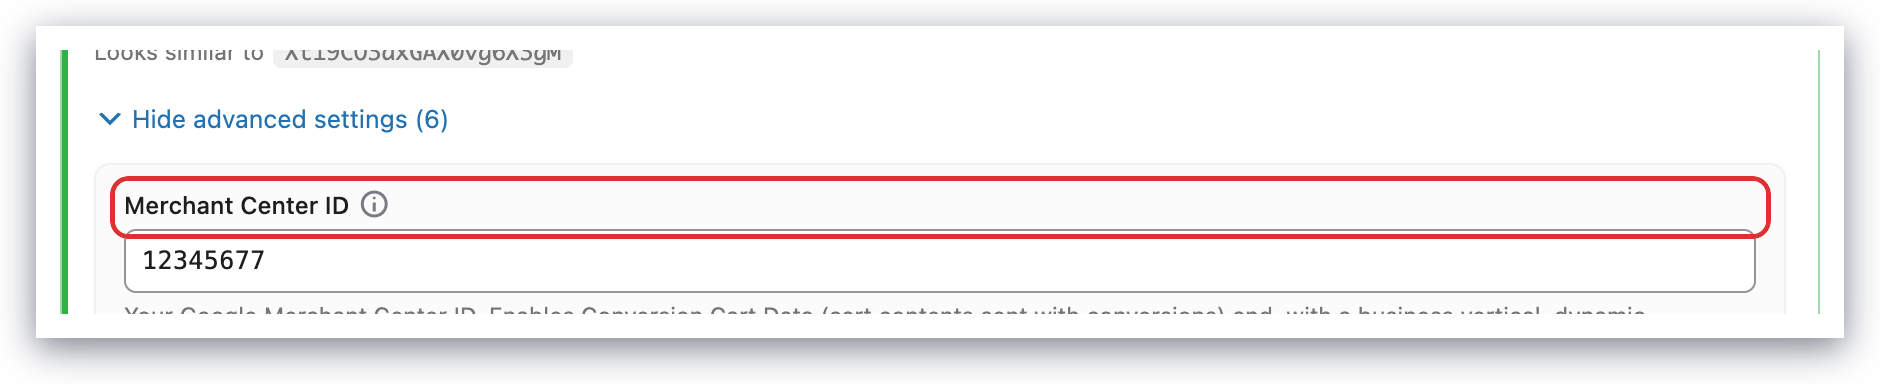
The field accepts 6 to 12 digits and nothing else. If you paste a full URL, a value with spaces or an ID with dashes, the Pixel Manager rejects it, restores the previous value and shows the message "You have entered an invalid merchant ID. It only contains 6 to 12 digits."
What needs to be in place
Conversion Cart Data only goes live when all of these are true:
- A Google Ads purchase conversion is configured in the Pixel Manager. Both the Conversion ID and the Conversion Label must be set. See Configure the plugin. The Merchant Center ID on its own does nothing.
- The Merchant Center ID is saved.
- Your Merchant Center account is linked to your Google Ads account. This is done on Google's side. See Link a Google Ads account to Merchant Center.
- The product IDs the Pixel Manager sends match the
idattribute in your Merchant Center feed. This is the single most common reason cart data reports stay empty. Set the matching value under Product identifier. If Google for WooCommerce generates your feed, use Post ID withgla_prefix.
What the Pixel Manager sends
Once the feature is active, the Google Ads purchase conversion carries these extra parameters on top of the usual transaction ID, value and currency:
| Parameter | Value |
|---|---|
aw_merchant_id | The Merchant Center ID you saved |
aw_feed_country | The visitor's country |
aw_feed_language | The shop's language, derived from the WordPress locale |
discount | The order's total discount |
items | One entry per line item, with the product id, the price excluding tax, the quantity and the business vertical |
The id of each item comes from your Product identifier setting, which is why that setting has to match your feed.
What you get in Google Ads
The cart data metrics appear in Google Ads under the Conversions column group, in the statistics tables at campaign, ad group and product level. Google also provides two predefined reports, Cart items sold and Cart items advertised.
Note on profit: revenue, orders, cart size and average order value come from the cart data alone. Gross profit and gross profit margin additionally require the cost_of_goods_sold attribute in your Merchant Center feed. Without COGS in the feed, Google Ads has no cost side to subtract and the profit columns stay empty. See Metrics available with conversions with cart data.
What entering the Merchant Center ID does not do. It does not replace the Conversion ID and Conversion Label setup, it does not create or upload a product feed, it does not get your products approved in Merchant Center, and it does not switch on dynamic remarketing. Dynamic remarketing is a separate feature, configured through the Business Vertical and the product identifier.
Verify the setup
- Check the plugin. Open the Pixel Manager Dashboard and look at the Automatically activated features card. Conversion cart data shows as
activeonce the conversion ID, the conversion label and the Merchant Center ID are all set. If it still showsinactive, the card tells you what is missing. - Check the actual event. Place a test order with the Console Logger enabled and look at the
Google Ads: conversion event sententry in the browser console. The payload must containaw_merchant_idand anitemsarray. Compare an itemidagainst the same product in your Merchant Center feed. They have to be identical, character for character. - Check Google Ads. Cart data metrics need conversions to be processed first. Give it a day or two before concluding that something is wrong, and make sure the report's date range covers the day of the ad click.
Troubleshooting
I can't find my Merchant Center ID. Sign in at merchants.google.com and read the number after a= in the address bar. If the URL has no a parameter, you are most likely on the account chooser rather than inside an account. Open an account first.
The field won't accept my ID. The field takes 6 to 12 digits only. Remove spaces, dashes, quotes and any surrounding URL, then paste just the number.
I entered the ID but see no cart data in Google Ads. Work through What needs to be in place in order. In practice the cause is almost always one of two things: the Merchant Center and Google Ads accounts are not linked, or the product IDs the Pixel Manager sends don't match the id attribute in the feed. Step 2 of Verify the setup tells the two apart, because it shows you the exact IDs being sent.
I see revenue but the profit columns are empty. Gross profit needs the cost_of_goods_sold attribute in your Merchant Center feed. Add it there, and the profit metrics start filling in.
I also use Google for WooCommerce. That is fine, the two plugins work side by side. Google for WooCommerce keeps the Merchant Center connection and the feed sync, the Pixel Manager does the Google Ads tracking. Set the product identifier to Post ID with gla_ prefix so the IDs match the feed it generates. See Using the Google for WooCommerce plugin at the same time.
Phone Conversion Number
Google Ads allows tracking calls to a phone number on a website. It does this by automatically swapping the actual phone number with a Google number which will redirect the call to the actual phone number.
You can test the phone swapping by appending the following URL parameter on one of the pages where your phone number appears: #google-wcc-debug
The URL would then look like this: https://example.com/#google-wcc-debug
You'll find more info about phone call conversion tracking on the Google support pages here.
The setting above tracks a single number. To track a different phone number and conversion label per store location, see the recipe Track phone conversions for multiple store locations.
Conversion Adjustments
This is a feature only available for users of the Pro version. Get the Pro version here.
When Google Ads processes your conversion adjustment upload, it will show errors for orders that didn't originally come from a Google Ads click. For example, orders from organic search, direct visits, email campaigns, or other ad platforms. Since the Pixel Manager includes all refunded and cancelled orders in the feed (not just Google Ads orders), Google reports errors for the ones it can't match to a Google Ads conversion.
This is exactly what Google recommends and can be safely ignored. The adjustments for actual Google Ads conversions will be applied correctly.
The error messages you'll see are:
- "This conversion does not exist. Double-check all the parameters."
- "The conversion action specified in the adjustment request cannot be found. Make sure it's available in this account."
Google may also send email notifications and show campaign-level warnings about these errors. Despite how alarming they look, they are triggered by the same expected errors described above. This is an inconsistency on Google's side. Their warning system flags behavior that their own documentation tells you to expect. You can safely ignore these notifications as long as your upload report shows a mix of successful and failed rows.
If all rows fail (not just some), then something is misconfigured. Double-check that the conversion name in the Pixel Manager matches the Google Ads conversion name exactly (including capitalization and spacing), and that the upload schedule runs from the same Google Ads account that owns the conversion action.
For a detailed explanation, read our blog post: Why Google Ads Shows Errors for Conversion Adjustment Uploads.
General Info
Google Ads Conversion Adjustments allow you to restate or retract conversions after they've been sent to Google Ads. This is particularly useful when orders get canceled, partially and fully refunded after the initial purchase.
The Pixel Manager generates a CSV file with all necessary data that can be consumed by Google Ads every night.
To learn more about Conversion Adjustments, read the following Google Ads Help article: https://support.google.com/google-ads/answer/7686447
Set up conversion adjustments
-
Copy the conversion name of the purchase conversion in Google Ads.
- Open Google Ads
- Open > Goals > Conversions > Summary > Goals
- Open the purchase conversion

- Copy the conversion name

-
In the Pixel Manager, open Tracking Pixels → Google (Ads & GA4) and paste the conversion name into the Conversion Adjustments: Conversion Name field (under Show advanced settings). The name has to match exactly.
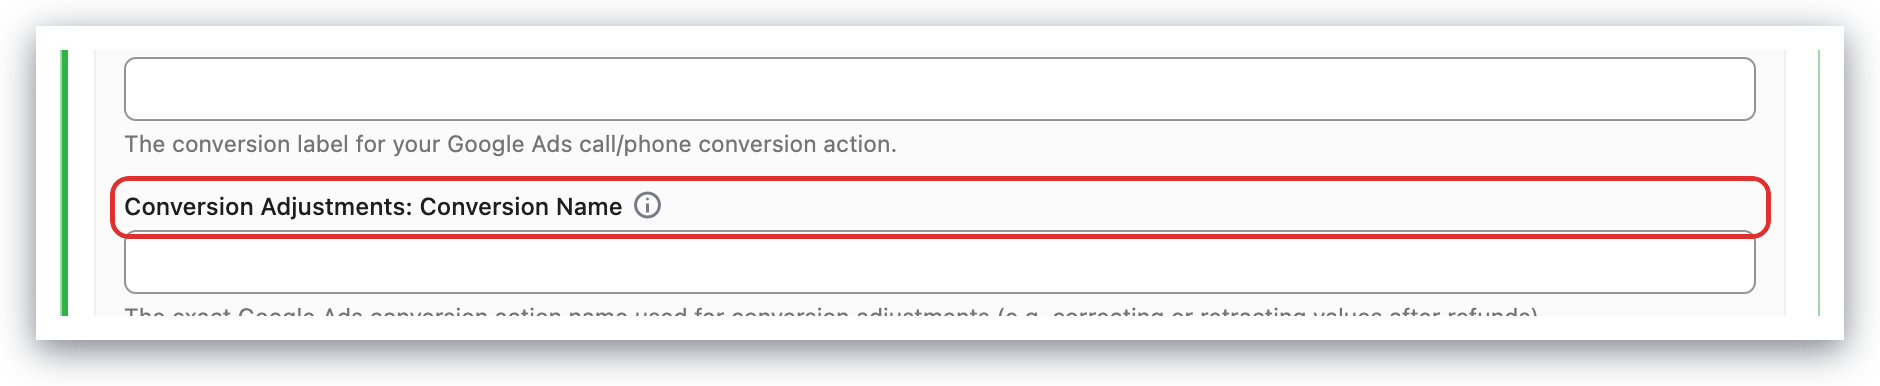
- Copy the conversion adjustments feed name from the Pixel Manager.
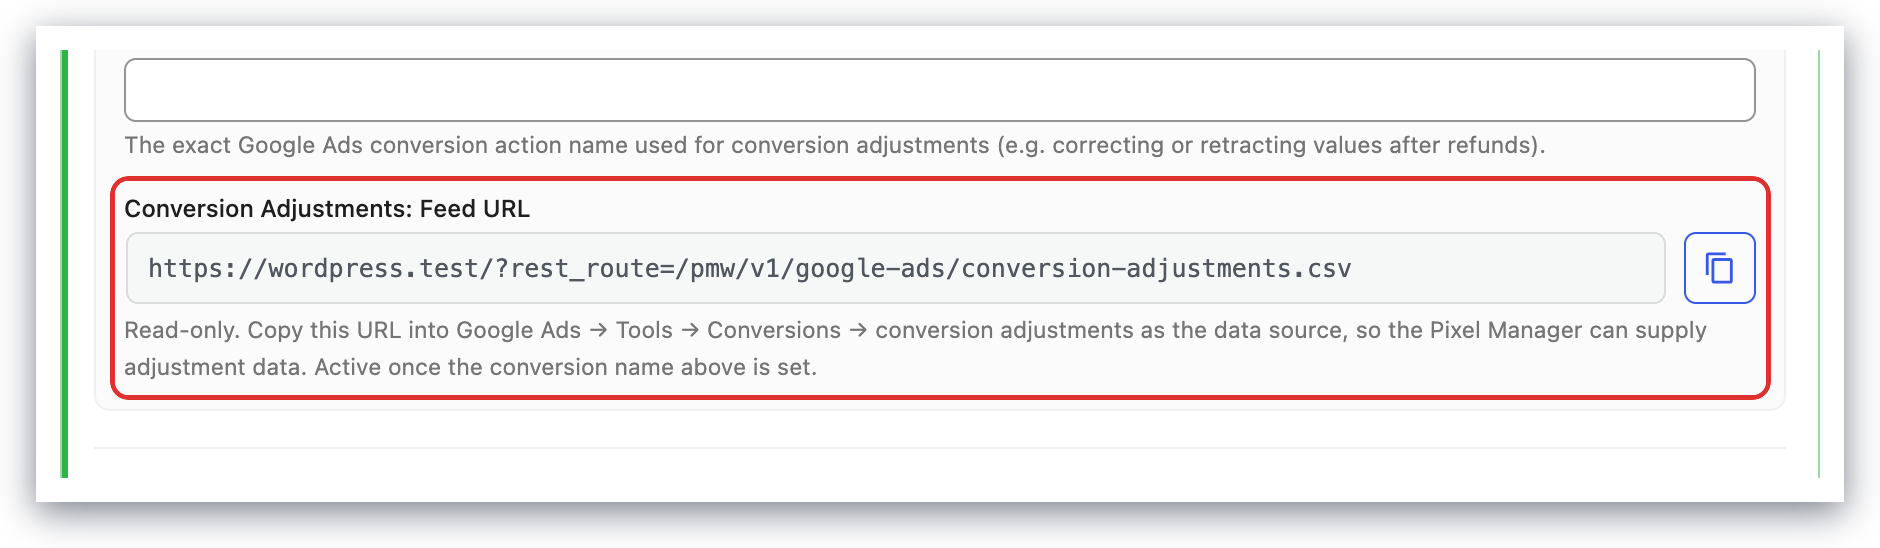
-
Set up a nightly upload of the conversion adjustments in Google Ads.
- Open Google Ads
- Open > Goals > Conversions > Uploads > Schedules
- Create a new schedule

Settings:
- Protocol: HTTPS
- Source URL: The feed URL you copied from the Pixel Manager
- Frequency: Every 24 hours
- Time: 3:00 AM

- Click Save & Preview
The Username and Password fields are optional. Leave them empty unless you have protected the feed with the credentials filter.
-
Done
Google is moving scheduled uploads into Tools → Data manager, and in some accounts the Schedules tab no longer offers a plus button to create a new schedule. Data Manager's HTTPS data source asks for a mandatory username and password, but it cannot import conversion adjustments: its conversion import has no adjustment type or adjusted value fields, so the Pixel Manager feed cannot be mapped there.
If your account still shows the plus button on Goals → Conversions → Uploads → Schedules, set the schedule up there as described above. If the plus button is gone, Google has removed the file-based path for your account. The remaining route is the Data Manager API, which we are working on for a future release.
From now onward, Google Ads will download new conversion adjustments every night.
Additional Info
The Pixel Manager generates a list of adjustments that are between 2 and 4 days old. This is Google's recommended way how to upload conversion adjustments. The reason why it should not generate a list of adjustments right after they happen is the following: Google Ads can take up to 24 hours to process the initial purchase conversions. So if we upload conversion adjustments before Google Ads processes the initial conversions, Google Ads would throw an error.
The following is a report of what a regular conversion adjustments upload looks like:

Supported Events
Here's a list of supported events.
Custom Variables
This is a pro feature. Get the pro version here
Available from version 1.43.5 of the Pixel Manager
Google Ads allows you to track Custom Variables.
With the following filter you can add Custom Variables to the purchase conversion event:
add_filter('pmw_google_ads_order_custom_variables', function ($custom_variables, $order) {

    $custom_variables['example_variable'] = 'example_string';
    $custom_variables['color']            = 'example_blue';
    $custom_variables['product_name']     = 'example_name';

    return $custom_variables;

}, 10, 2);

