Google Ads
Create a new conversion in Google Ads
How to set up a purchase conversion in Google Ads
Skip this step, if you've already created a purchase conversion in Google Ads
We highly recommend setting up the native Google Ads conversion action instead of importing GA4 conversions. Here's why: Use Google Ads conversion tracking instead of importing GA4 events
- Open Conversions in Google Ads

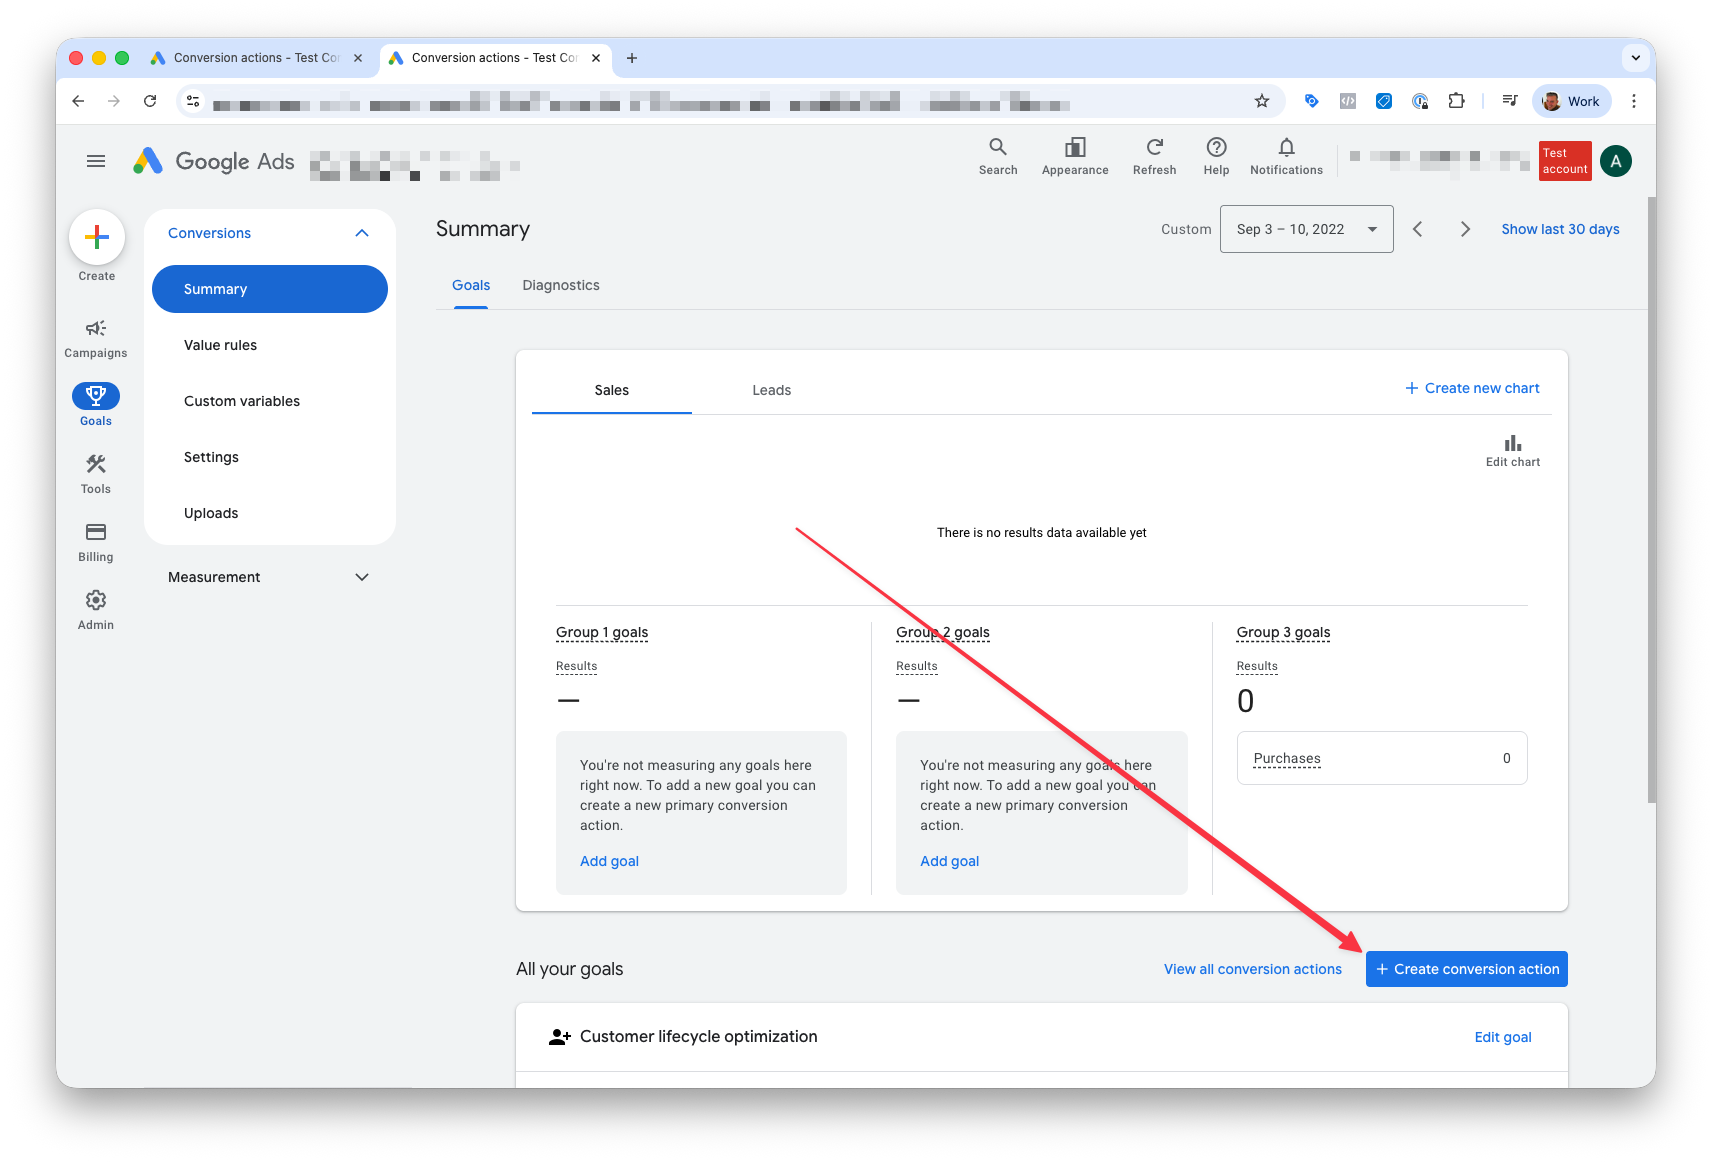
- Initiate a new conversion creation
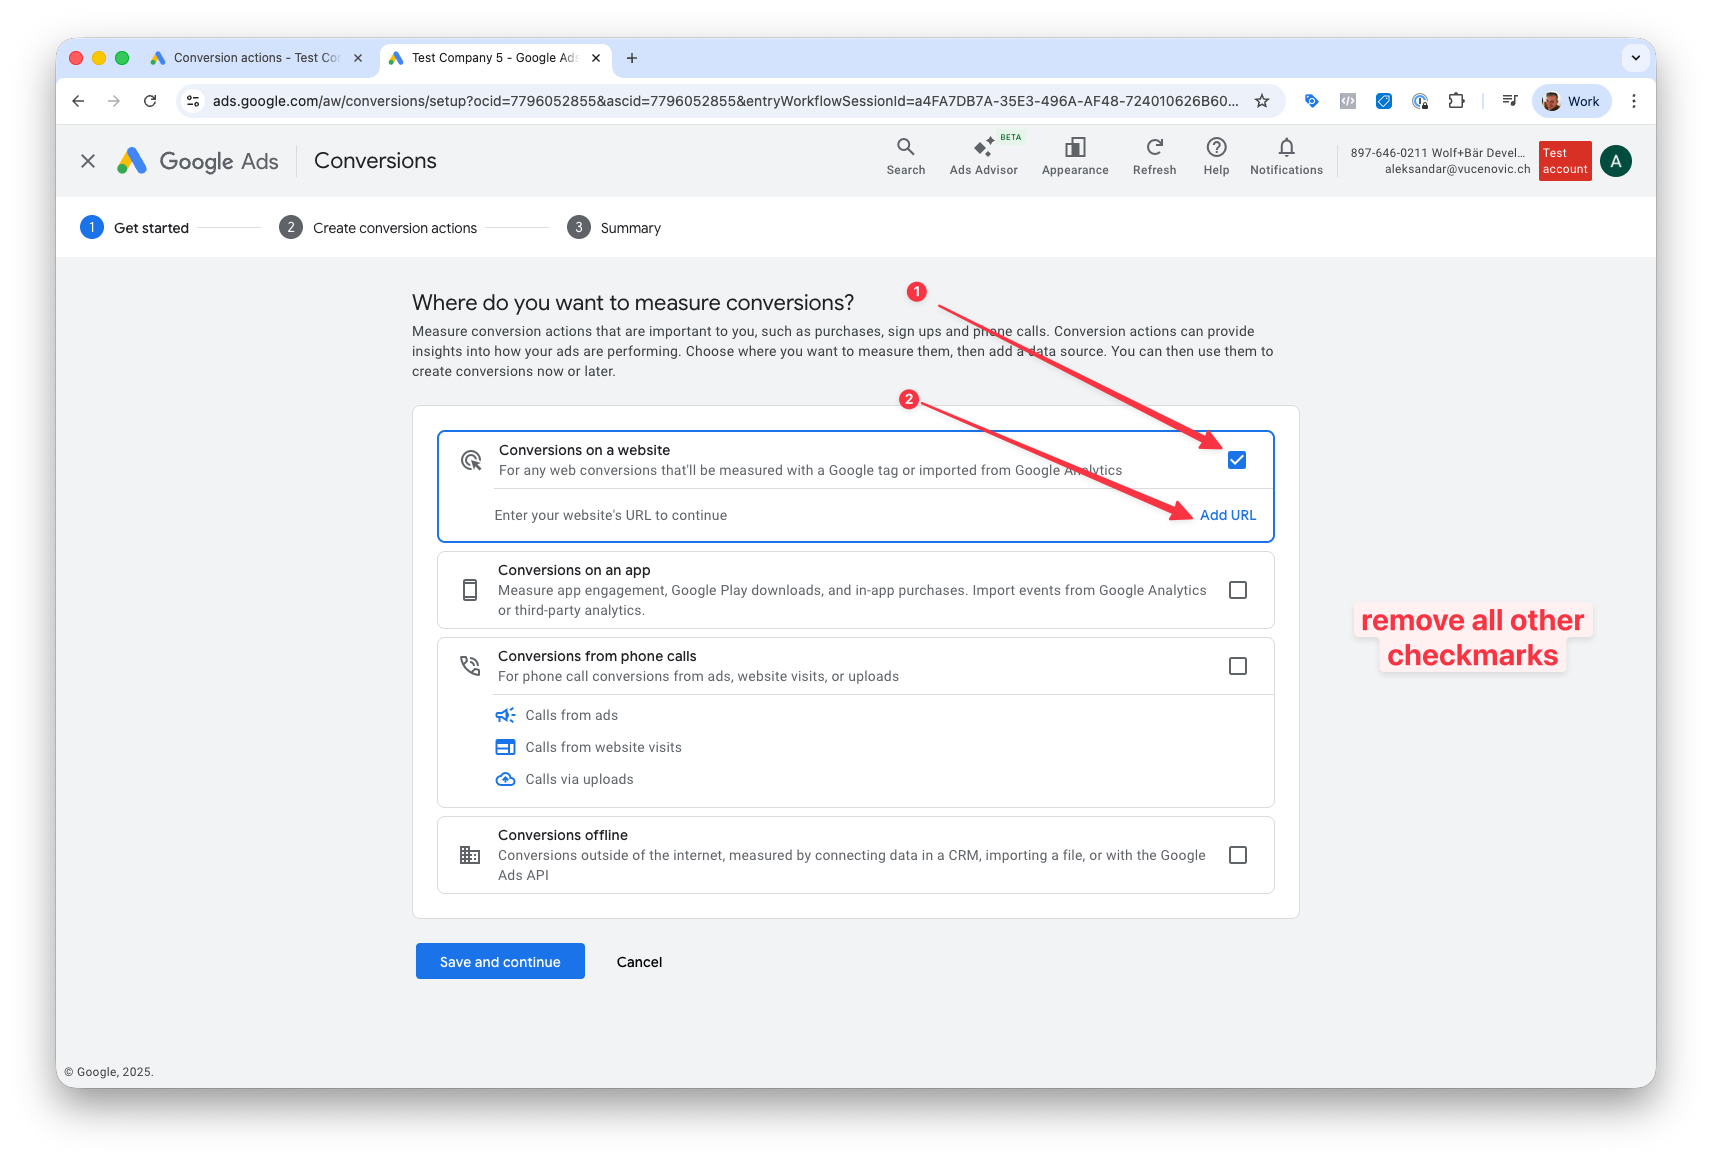
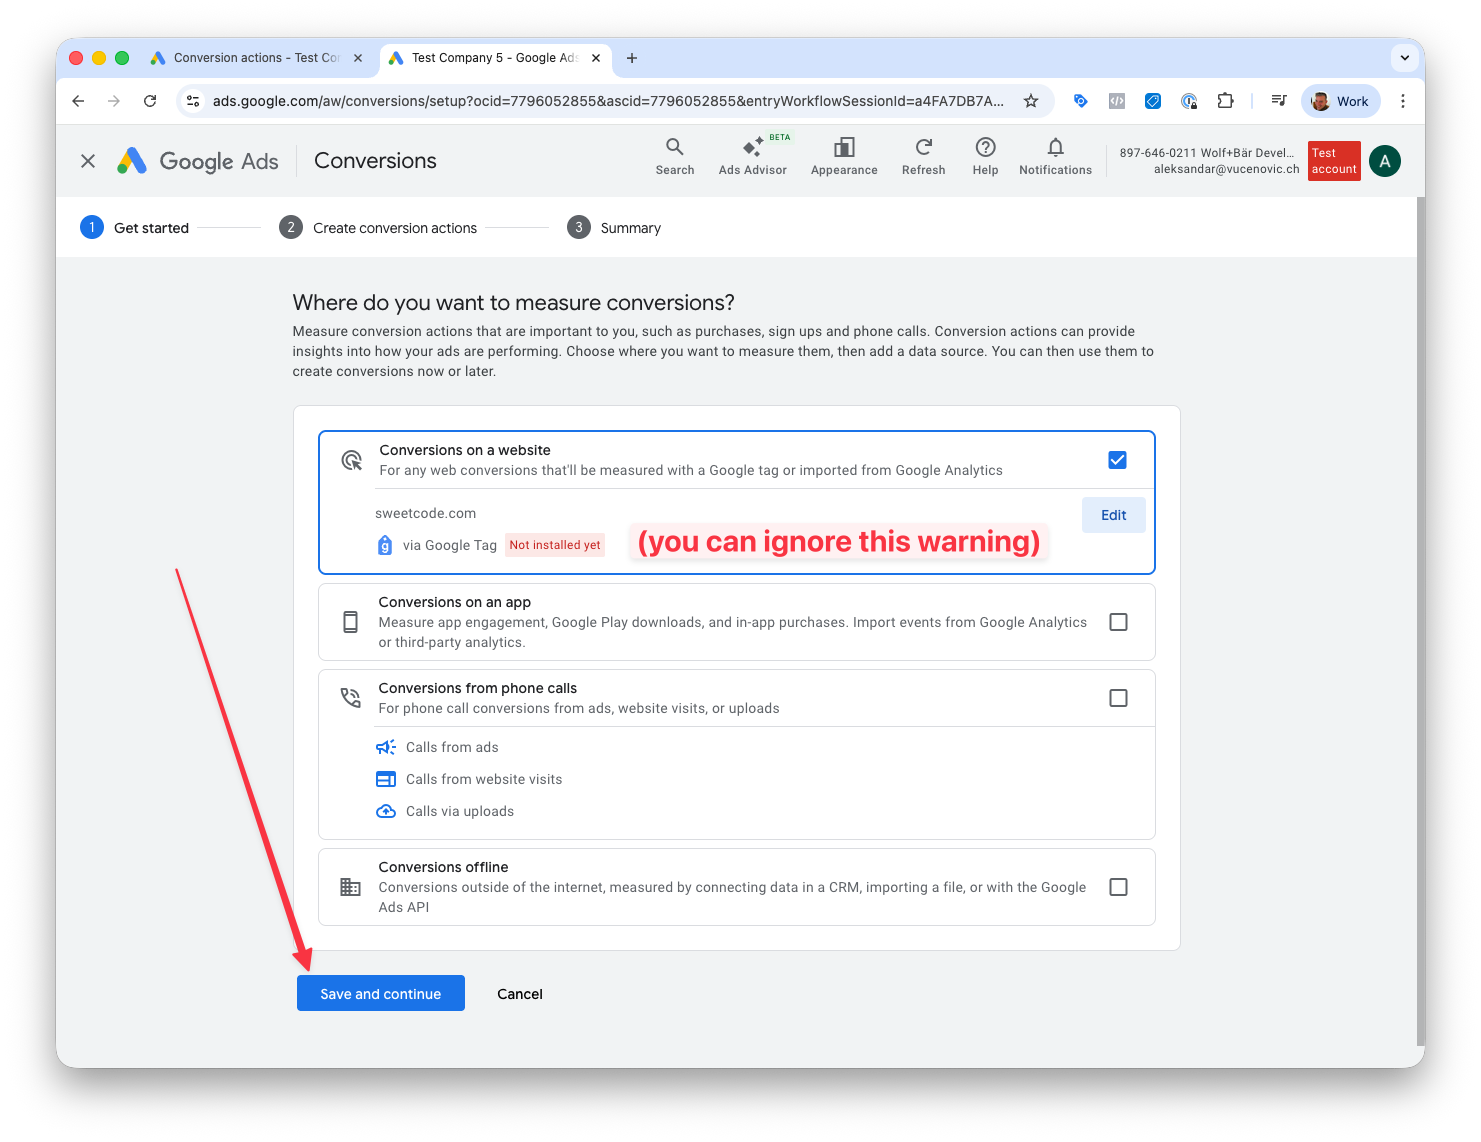
- Choose conversion type
Conversion on a website.
Add the URL of your website.
(Remove all other checkboxes)
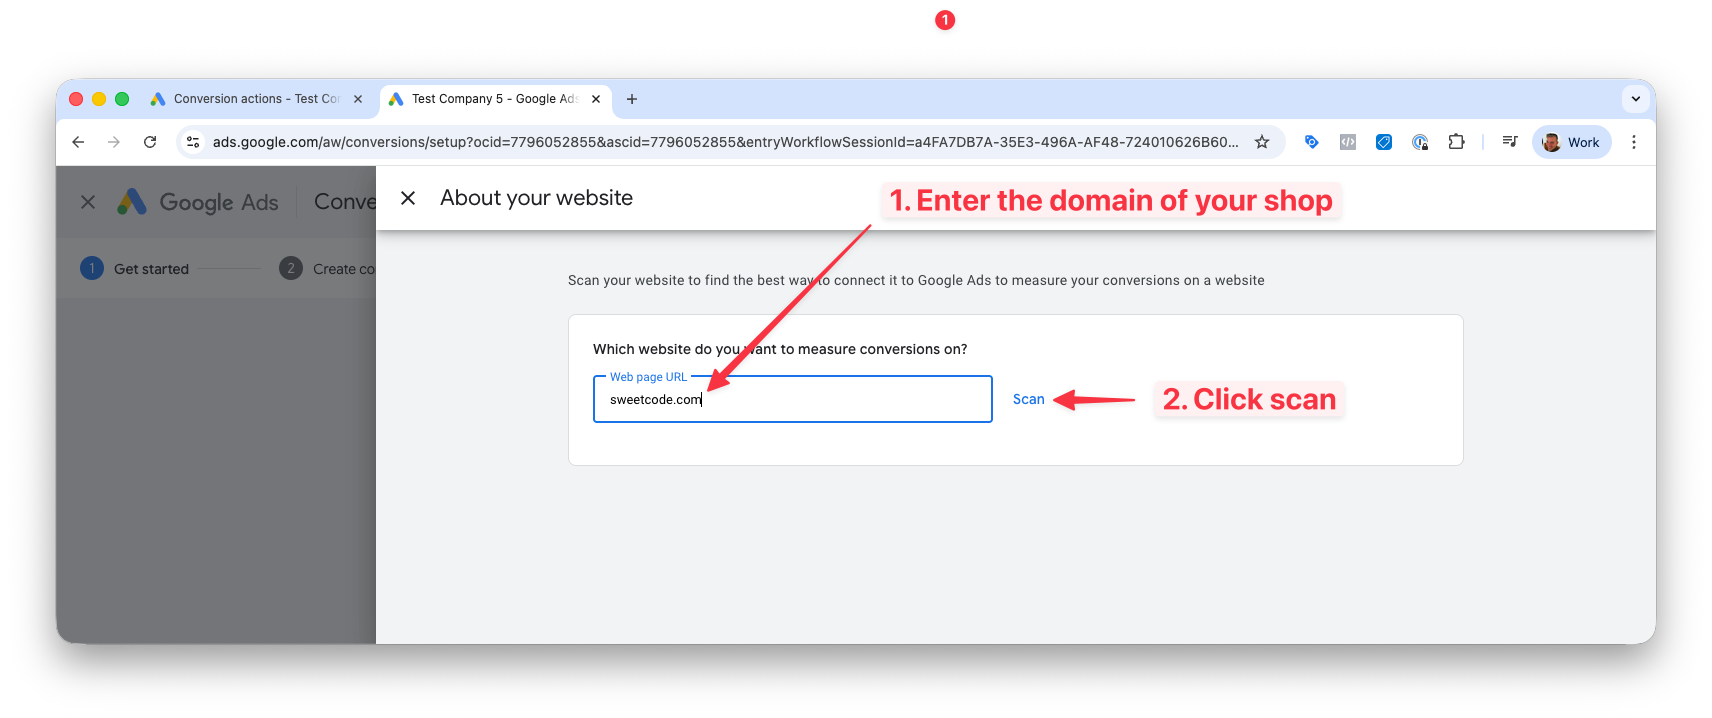
- Scan your domain
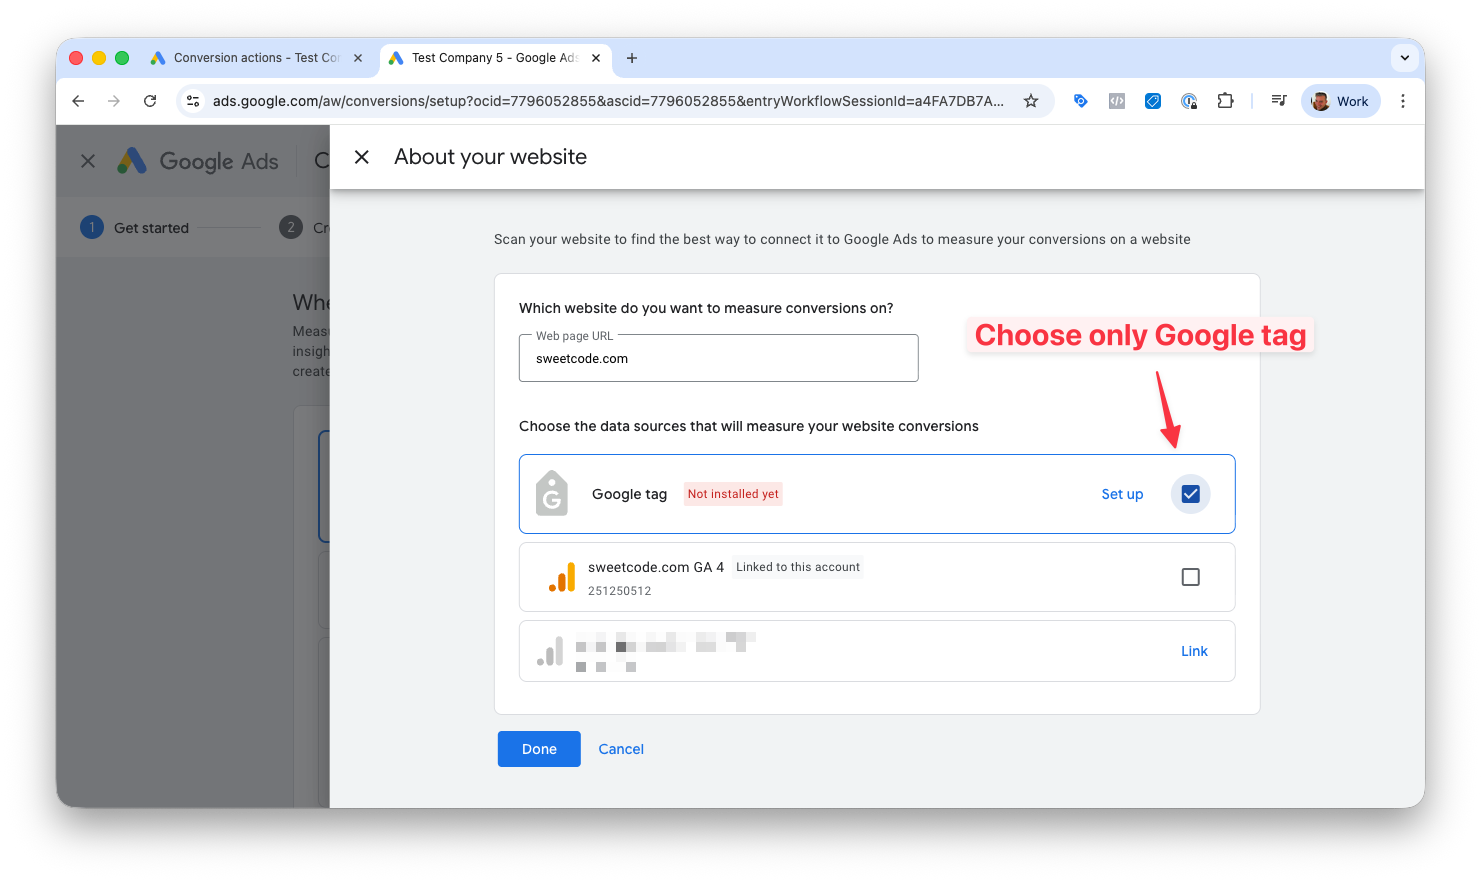
- Choose the
Google tagonly
- Save and continue
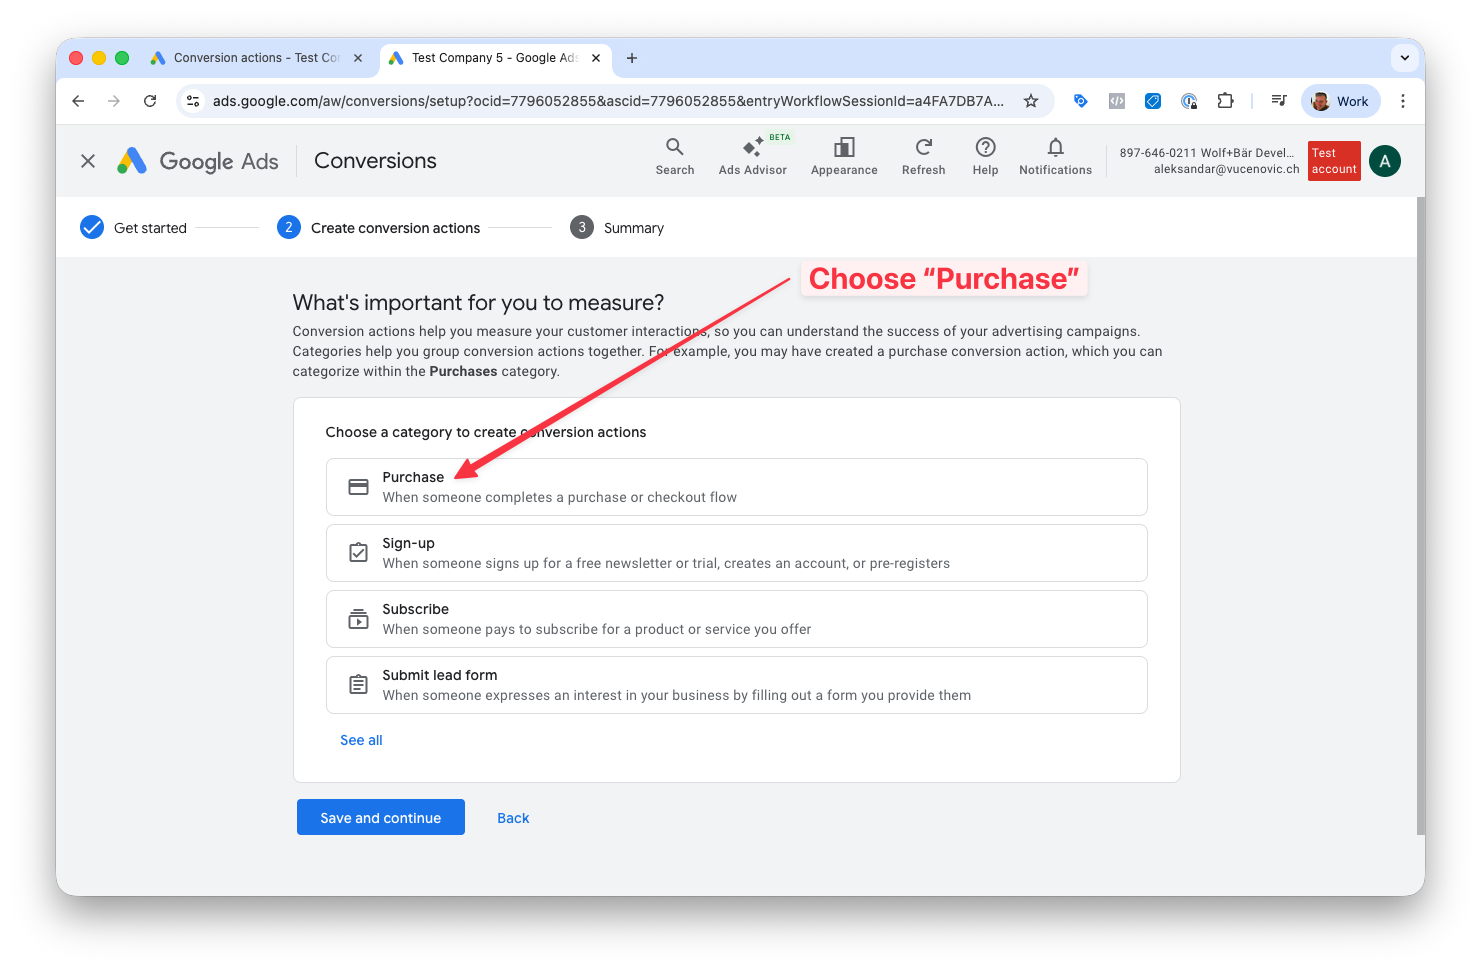
- Choose
Purchaseas the conversion category
-
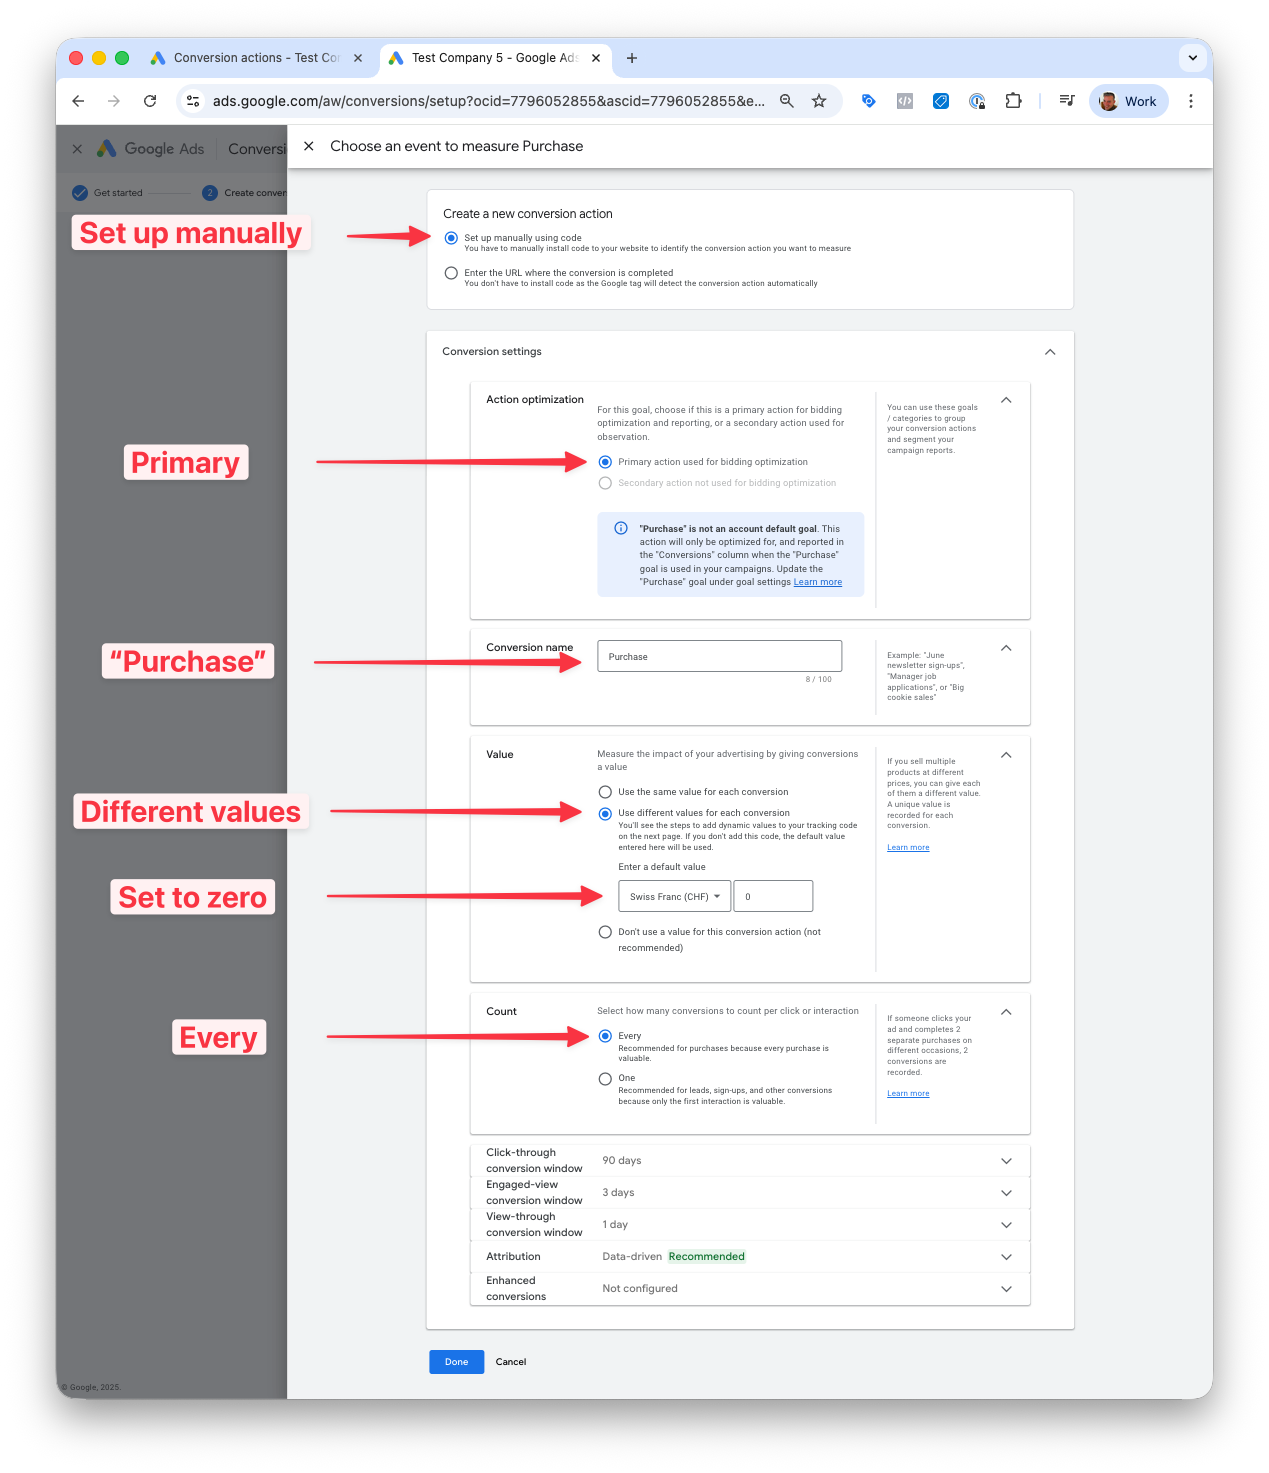
Configure the Google Ads conversion settings
Use the following default settings. Only change if you know what you're doing.
- Create new conversion action: Set up manually using code
- Action optimization: Primary action used for bidding optimization
- Conversion name: Purchase
- Value: Use different values for each conversion
- Default value: zero
- Count: Every
Configure the plugin
How to find and set the conversion ID and conversion label
-
Get the conversion ID and conversion label
Open the purchase conversion in Google Ads.

Copy the purchase conversion ID and label from the Google Tag Manager tab.

-
Set the conversion ID and label in the plugin

Conversion Cart Data
This feature adds another level of detail to the purchase conversion. Along with the conversion value, it will add information about the items sold. In return, you will see more detailed revenue metrics for the Google Shopping campaigns.
Benefits
- Detailed reporting on items sold
- Clear measure of revenue and profit generated by Shopping Ads
- Detailed reporting on cart size and average order value
Google support article on Conversion Cart Data (conversions with basket data)
Setup
Enable this feature by saving the Google Merchant Center ID in the plugin.
You can find the Google Merchant Center ID in the URL after you log into the Google Merchant Center.

Then enter the Google Merchant Center ID in the Conversion Cart Data field in the plugin settings under > Advanced > Google

Phone Conversion Number
Google Ads allows tracking calls to a phone number on a website. It does this by automatically swapping the actual phone number with a Google number which will redirect the call to the actual phone number.
You can test the phone swapping by appending the following URL parameter on one of the pages where your phone number appears: #google-wcc-debug
The URL would then look like this: https://example.com/#google-wcc-debug
You'll find more info about phone call conversion tracking on the Google support pages here.
Conversion Adjustments
This is a feature only available for users of the Pro version. Get the Pro version here.
When Google Ads processes conversion adjustments for conversions that were not triggered by Google Ads, you will see the error message:
This conversion does not exist. Double-check all the parameters.
This error message is documented by Google and can be safely ignored: Google support article.
General Info
Google Ads Conversion Adjustments allow you to restate or retract conversions after they've been sent to Google Ads. This is particularly useful when orders get canceled, partially and fully refunded after the initial purchase.
The Pixel Manager generates a CSV file with all necessary data that can be consumed by Google Ads every night.
To learn more about Conversion Adjustments, read the following Google Ads Help article: https://support.google.com/google-ads/answer/7686447
Set up conversion adjustments
-
Copy the conversion name of the purchase conversion in Google Ads.
- Open Google Ads
- Open > Tools and Settings > Measurement > Conversions
- Open the purchase conversion

- Copy the conversion name

-
Paste the conversion name into the Pixel Manager. The name has to match exactly.

- Copy the conversion adjustments feed name from the Pixel Manager.

-
Set up a nightly upload of the conversion adjustments in Google Ads.
- Open Google Ads
- Open > Tools and Settings > Measurement > Conversions > Uploads > Schedules
- Create a new schedule

Settings:
- Protocol: HTTPS
- Source URL: The feed URL you copied from the Pixel Manager
- Frequency: Every 24 hours
- Time: 3:00 AM

- Click Save & Preview
-
Done
From now onward, Google Ads will download new conversion adjustments every night.
Additional Info
The Pixel Manager generates a list of adjustments that are between 2 and 4 days old. This is Google's recommended way how to upload conversion adjustments. The reason why it should not generate a list of adjustments right after they happen is the following: Google Ads can take up to 24 hours to process the initial purchase conversions. So if we upload conversion adjustments before Google Ads processes the initial conversions, Google Ads would throw an error.
The following is a report of what a regular conversion adjustments upload looks like:

Supported Events
Here's a list of supported events.
Custom Variables
This is a pro feature. Get the pro version here
Available from version 1.43.5 of the Pixel Manager
Google Ads allows you to track Custom Variables.
With the following filter you can add Custom Variables to the purchase conversion event:
add_filter('pmw_google_ads_order_custom_variables', function ($custom_variables, $order) {

    $custom_variables['example_variable'] = 'example_string';
    $custom_variables['color']            = 'example_blue';
    $custom_variables['product_name']     = 'example_name';

    return $custom_variables;

}, 10, 2);